Item Preview System New
The Item Preview System is a comprehensive enhancement for the MFPS shop that provides players with detailed, immersive previews of in-game items. It goes beyond simple icons to offer interactive 3D models, animations, and specialized renderers for cosmetic items like emblems and calling cards.
System Architecture
The Item Preview System follows a modular architecture with clear separation of concerns:
- bl_ItemPreviewManager - Central singleton manager that coordinates all preview functionality
- bl_ItemPreviewWindow - Main UI window that handles different preview types and templates
- bl_ItemPreviewData - ScriptableObject that stores all preview configurations
- bl_ItemPreviewTrigger - Component that attaches to shop items to enable preview functionality
- bl_ShopManager_Patch - Non-invasive integration patch that extends existing shop items
Key Features
- Weapons (MFPS Core)
- Weapon Camos (MFPS Customizer)
- Player Skins (MFPS Player Selector)
- Emblems & Calling Cards (EACC Addon)
- Characters & Cloths (BlinkBox Character Customization)
Interactive 3D Previews
Automatically loads and displays 3D models for weapons and skins. Includes auto-rotation logic to showcase items from all angles with mouse interaction support.
// Weapon model rotation with mouse interaction
public class bl_WeaponModelRotator : MonoBehaviour
{
    public float RotationSpeed = 30f;
    public float MouseSensitivity = 5f;
    public bool AutoRotate = true;
    public bool InvertVertical = false;
}
Animation Support
Full support for previewing animated items such as character emotes, victory poses, and animated skins using the Animator system with proper state management.
Specialized Rendering
Dedicated rendering logic for 2D cosmetic items like Emblems and Calling Cards, handling layers, outlines, and backgrounds automatically with custom renderers.
// Character customization rendering
public class bl_CC_Render : MonoBehaviour
{
    public void PreviewItem(int clothID, bool loadSavedLoadout = true);
    public void PreviewItem(ClothsItemInfo item, bool loadSavedLoadout = true);
}
Custom Statistics
Display detailed item stats with visual progress bars, allowing players to compare weapon attributes or item benefits easily with customizable stat configurations.
// Custom stats configuration
[System.Serializable]
public class ItemStat
{
    public string StatName;
    [Range(0f, 1f)]
    public float StatValue;
    public Color StatColor = Color.green;
}
Preview Types & Capabilities
The system intelligently handles various item types, automatically selecting the best presentation method based on the item's ShopItemType and configured PreviewType.
3D Model Mode
Used for Weapons, Player Skins, and 3D Accessories. The system instantiates the item model in a preview viewport and applies specialized rotator components:
- bl_WeaponModelRotator: Handles weapon models with mouse interaction and auto-rotation
- bl_CharacterModelRotator: Manages character models with head-look functionality
- Customizable rotation speed, axis, and mouse sensitivity
- Automatic centering and scaling with position/rotation offsets
// Preview type determination
private PreviewType DeterminePreviewType(ShopItemType itemType, PreviewType configuredType)
{
    if (configuredType != PreviewType.Default) return configuredType;

    switch (itemType)
    {
        case ShopItemType.Weapon: return PreviewType.Model3D;
        case ShopItemType.PlayerSkin: return PreviewType.Skin;
        case ShopItemType.Emote: return PreviewType.Emote;
        case ShopItemType.Emblem:
        case ShopItemType.CallingCard: return PreviewType.Image2D;
        case ShopItemType.WeaponCamo: return PreviewType.WeaponCamo;
        default: return PreviewType.Image2D;
    }
}
Advanced 2D Rendering
Used for Emblems and Calling Cards. Instead of just showing a static sprite, the system constructs composite images using specialized renderers:
- Emblems: Assembles background, main icon, and outline layers with proper scaling
- Calling Cards: Handles wide-format images with border effects and proper aspect ratios
- Template-based rendering with dedicated UI prefabs
Animation Mode
Used for Emotes and Gestures. Plays the associated Animation Clip on character models with proper state management:
- AnimationClip-based preview with smooth transitions
- Character model instantiation with proper rig setup
- Support for complex animation sequences and loops
Weapon Camo Mode
Specialized preview for weapon camouflages with material application:
- Dynamic material swapping on weapon models
- Support for both single and multi-camo systems
- Integration with MFPS Customizer system for camo data
// Weapon camo application
public void ApplyCamo(int camoID)
{
    var weaponData = bl_CustomizerData.Instance.GetWeapon(WeaponName);
    var camoInfo = weaponData.Camos.Find(x => x.ID == camoID);
    ApplyCamo(camoInfo.Camo);
}
Editor Workflow
The addon includes powerful custom editors to streamline the setup process for hundreds of items with advanced automation features.
Auto-Scan & Configuration
Location: BlinkBox > Item Preview System > Editor
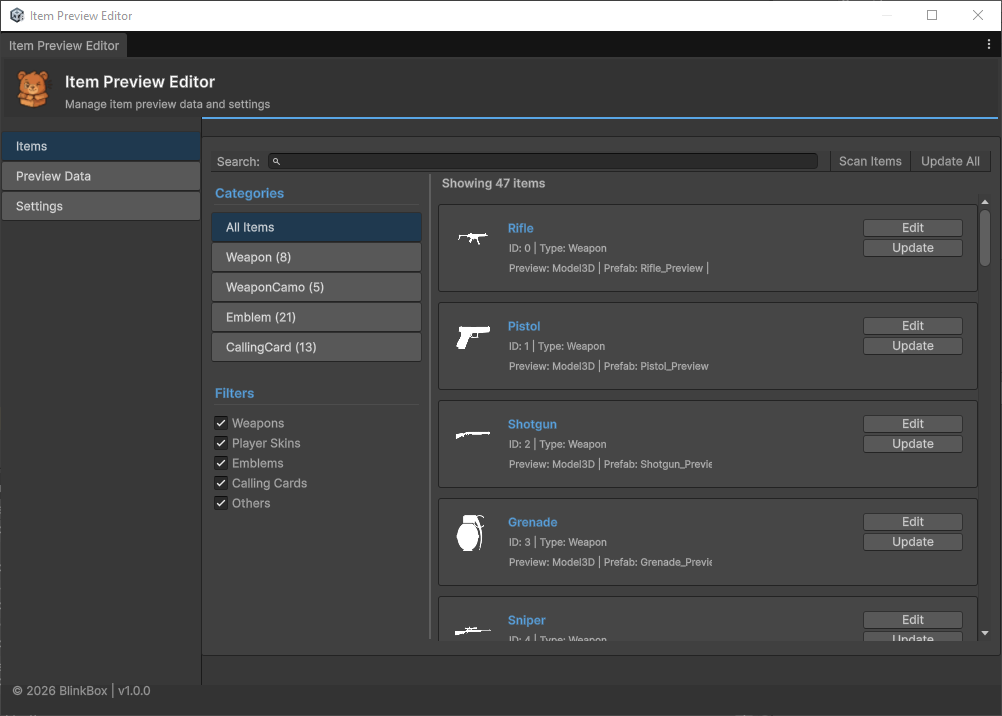
The main editor tool (bl_ItemPreviewEditor) provides comprehensive item management:
- Smart Scanning: Automatically detects all defined Shop Items in your database with progress tracking
- Bulk Operations: Generates preview data assets for all missing items with status monitoring
- Dynamic Type Detection: Automatically categorizes items based on ShopItemType with intelligent defaults
- Category Management: Organize items by type with collapsible sections and search functionality
- Item Status Tracking: Visual indicators for NotConfigured, Basic, Partial, Complete, and Featured items
Camo Weapon Extractor
Location: BlinkBox > Item Preview System > Camo Weapon Extractor
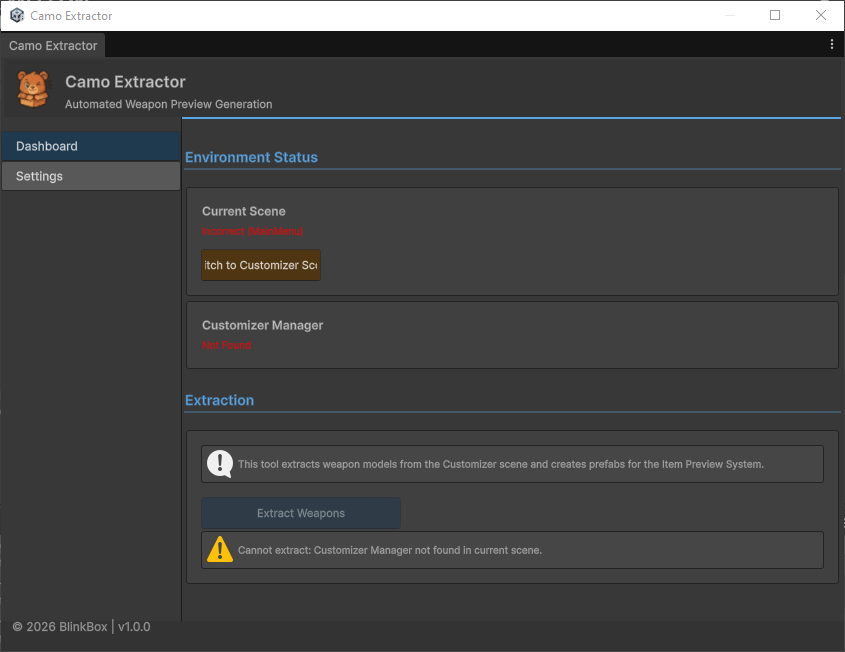
The specialized extractor (bl_CamoPreviewAutomator) automates weapon preview generation:
- Environment Validation: Checks for correct Customizer scene and manager availability
- Automated Extraction: Extracts weapon models from Customizer scene and creates preview prefabs
- Prefab Management: Organized storage in dedicated content folders with proper naming
- Batch Processing: Handles multiple weapons with progress tracking and error handling
Advanced Editor Features
The editor includes sophisticated features for professional workflow:
Data Configuration
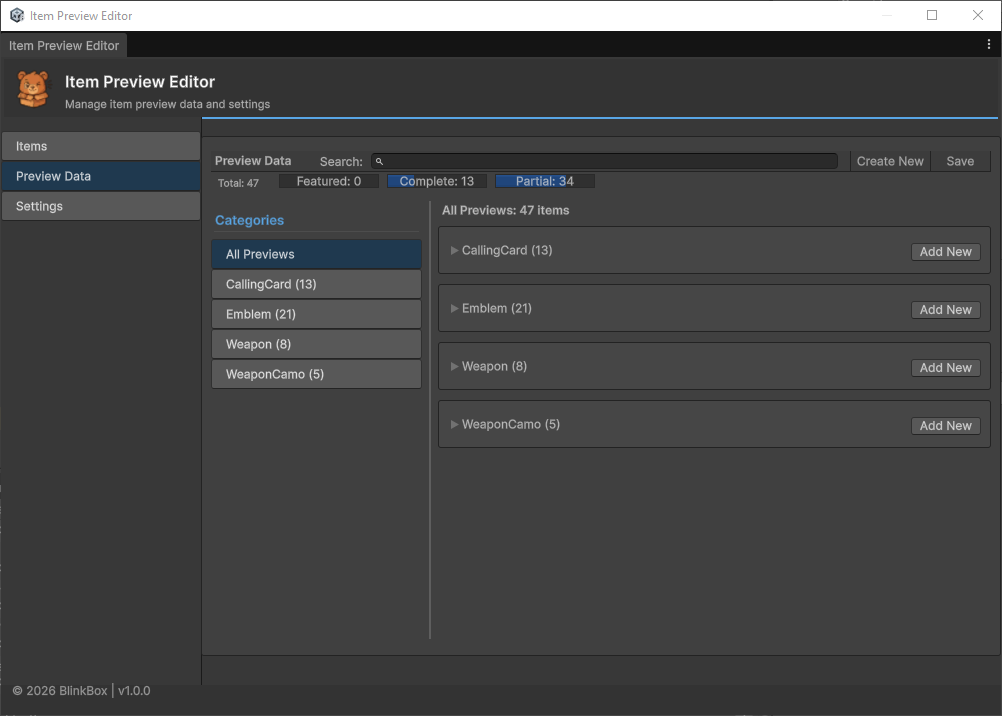
Global Settings
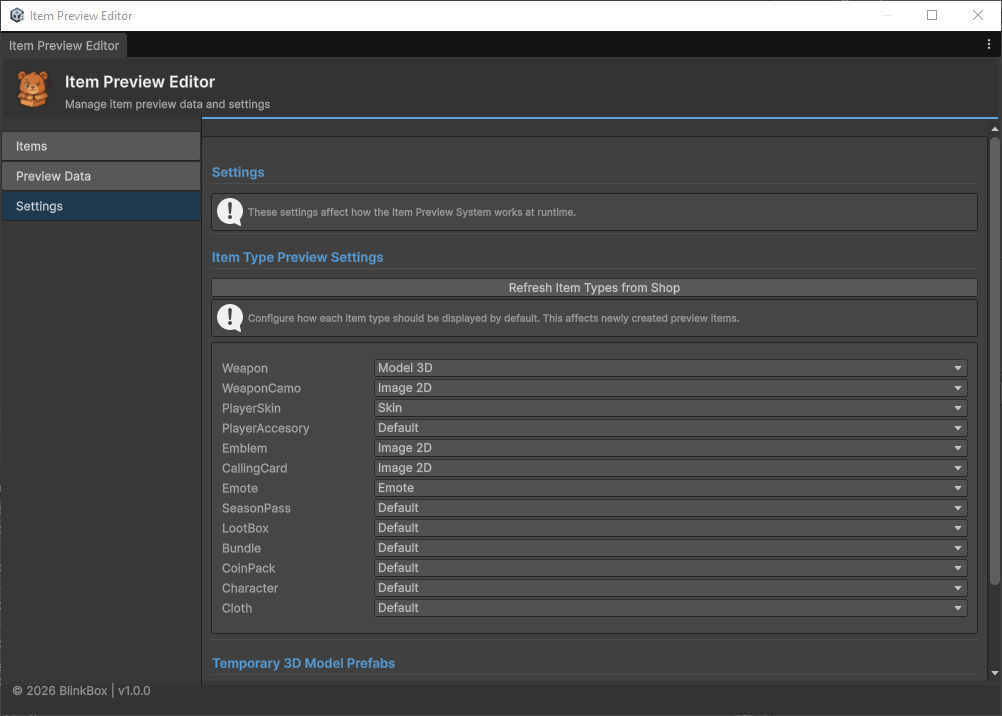
- Search & Filter: Real-time search with highlighting and category filtering
- Status Caching: Intelligent caching to avoid recalculating item status
- Navigation Controls: Category-based navigation with visual feedback
- Validation System: Comprehensive validation for required fields and dependencies
- Progress Tracking: Detailed progress bars and status messages for long operations
// Editor window configuration
public class bl_ItemPreviewEditor : bl_EditorWindowBase
{
    private Dictionary<ShopItemType, bool> _categoryFoldouts;
    private Dictionary<string, ItemStatus> _itemStatusCache;
    private Vector2 _scrollPosition;
    private string _searchText = "";

    // Status tracking
    private enum ItemStatus
    {
        NotConfigured, Basic, Partial, Complete, Featured
    }
}
Template System
To support diverse item categories, the system uses a flexible Template Architecture with dynamic template mapping and specialized renderers for each item type.
Template Mapping System
The system uses a sophisticated template mapping mechanism that automatically assigns the appropriate template based on ShopItemType:
// Template mapping initialization
private void InitializeTemplateMappings()
{
    _itemTypeTemplates.Clear();
    _itemTypeRenderers.Clear();

    // Register templates for each item type
    if (emblemTemplate != null && emblemRendererInTemplate != null)
    {
        _itemTypeTemplates[ShopItemType.Emblem] = emblemTemplate;
        _itemTypeRenderers[ShopItemType.Emblem] = emblemRendererInTemplate;
    }

    if (callingCardTemplate != null && callingCardRendererInTemplate != null)
    {
        _itemTypeTemplates[ShopItemType.CallingCard] = callingCardTemplate;
        _itemTypeRenderers[ShopItemType.CallingCard] = callingCardRendererInTemplate;
    }
}
Supported Template Types
- Weapon Template: Focused on 3D viewing area with weapon model rotator and stats display
- Bundle Template: Layout for displaying multiple included items with organized presentation
- Loot Box Template: Supports mystery effects and particle systems with reveal animations
- Coin/Currency Template: Highlight effects for premium currency packs with value emphasis
- Season Pass Template: Tier-based visualization layout with progression indicators
- Emblem Template: Specialized 2D rendering with background, icon, and outline layers
- Calling Card Template: Wide-format presentation with border effects and proper scaling
- Weapon Camo Template: Material preview system with dynamic camo application
Template Activation System
Templates are dynamically activated based on the current item type, with proper cleanup and state management:
// Template activation with proper cleanup
private void ActivateTemplate(ShopItemType itemType)
{
    // Deactivate all templates first
    DeactivateAllTemplates();

    // Activate the appropriate template
    if (_itemTypeTemplates.TryGetValue(itemType, out GameObject template))
    {
        template.SetActive(true);
        _activeTemplate = template;

        // Get the renderer for this template
        if (_itemTypeRenderers.TryGetValue(itemType, out object renderer))
        {
            // Configure renderer based on item type
            ConfigureRenderer(renderer, itemType);
        }
    }
}bl_ItemPreviewWindow inspector. Each template can have its own specialized renderer components for advanced functionality.
Integration & API Usage
The Item Preview System provides a clean, non-invasive integration with the existing MFPS shop system through extension methods and patch components.
Non-Invasive Integration
The system integrates seamlessly without modifying core MFPS scripts through:
- Extension Methods:
bl_ShopItemUI_Extensionadds preview functionality to existing shop items - Patch Components:
bl_ShopManager_Patchextends shop manager with preview capabilities - Trigger Components:
bl_ItemPreviewTriggercan be added to any UI element to enable previews
API Usage Examples
// 1. Simplest Method: Using bl_SimpleItemRenderer
// This component handles data retrieval and preview triggering automatically
public class MyCustomShop : MonoBehaviour
{
    [SerializeField] private bl_SimpleItemRenderer simpleRenderer;

    public void OpenWeaponPreview(int weaponID)
    {
        // Just feed the ID and Type, and it auto-shows the preview
        simpleRenderer.ShowPreview(weaponID, ShopItemType.Weapon);
    }
}

// 2. Direct Manager Usage
public void ShowPreviewManual(ShopProductData item)
{
    // The system automatically determines preview type and template
    bl_ItemPreviewManager.Instance.ShowPreview(item);
}

// 3. Check if preview system is initialized
public bool IsPreviewSystemReady()
{
    return bl_ItemPreviewManager.Instance != null &&
           bl_ItemPreviewManager.Instance.IsInitialized;
}
Data Configuration
Preview data is stored in ScriptableObject assets for easy management:
// Creating preview data programmatically
[CreateAssetMenu(menuName = "MFPS/Item Preview Data")]
public class bl_ItemPreviewData : ScriptableObject
{
    public int ItemID;
    public PreviewType previewType = PreviewType.Default;
    public GameObject ModelPrefab;
    public Sprite ItemIcon;
    public List<ItemStat> CustomStats;
    public string Description;
    public bool IsFeatured;
}
Shop Integration Points
The system hooks into the MFPS shop at multiple points:
- Item Selection: Preview triggers on item selection/hover
- Purchase Flow: Preview windows can be shown during purchase confirmation
- Inventory View: Previews work in both shop and inventory contexts
- Customization Integration: Special handling for character customization items